

1. Become One with the Sky
The first thing you have to be aware of is the sky conditions and light pollution. If the sky is overcast or there is a full moon, unfortunately, you're not going to have any luck getting a clear shot. Keep track of the weather, the moon's phases and its position to get the optimal crystal clear sky. Additionally, you also have to be aware of city light pollution. You often see astrophotography in empty, rural scenarios, because these are the only places that are far enough from light pollution in the sky. There are many phone apps that will help you track not only the moon but also map dark skies in your area, the milky way and constellations. I suggest PhotoPills, Star Walk and Dark Skies Finder to help you plan the ultimate shot.
2. Manually Focus + Aperture
Your camera is smart, but it will get confused when you tell it to focus on a big dark space. You will need to manually focus on the stars by turning your focus to infinity. Obtaining sharps focus also means you need to think about aperture, I choose to never fall below F5.6 for astrophotography. If you are shooting just the sky, you can shoot wide open, however, if you would like to capture landmarks in the foreground as well, which makes for an interesting shot, shooting wide open could mean there will be focus issues.
3. Choose Daylight White Balance
After all, the stars are very tiny suns... or the sun is a giant star? Your pick. Choose daylight for your white balance to accurately capture their colour. You'll be amazed at the colours and detail your camera will pick up that we can't see with the naked eye.
4. Use a Wide Lens
Using a wide lens not only will allow you to capture more of the sky, but it will also allow you to let more light into your lens, which when you're shooting the dark night sky you need as much as possible. I opt for shooting with a 12-24mm lens.
6. Use a Tripod
Using a tripod is essential when taking astrophotography, especially when shooting star trails. Your shutter speeds will be far too slow to be able to hand shoot, and your stars will end up looking like shaky streaks. For an even more steady shot opt to use a camera remote to avoid touching your camera entirely. If you're in a pinch, you can try to balance your camera on a steady surface like a rock or a picnic table.
7. Use Bulb Mode
This goes back to using a remote shutter release. By using bulb mode this allows you to control exactly how long your shutter stays open by the second. Some of your shots can be several minutes long, so it is needed when you have to shoot longer than your cameras slowest shutter speed. I suggest finding a remote that "beeps" so that you can count the seconds instead of trying to look at a screen in the dark. An illuminated screen, if bright enough, can cause light leaks into your shot.

8. ISO
Because you are literally taking a shot into the dark your ISO will need to be pushed to the limit. It's important you know your camera's limitations and dynamic range. For example with my Nikon D750 I know that it can handle a very high ISO, and I often shoot as high as 12800 without any issues.
9. Shoot in RAW
It is important that you remember to shoot in RAW mode to be able to capture as much information as possible. There will be quite a bit of post-processing in order to bring out the detail of the shot, so shooting in RAW will be able to make your shot go from good to great.
10. Types of Astrophotography
The way you choose to shoot depends on the type of shot you are after. There are two types of astrophotography, star trails, or a still shot, which is usually used to capture the milky way.
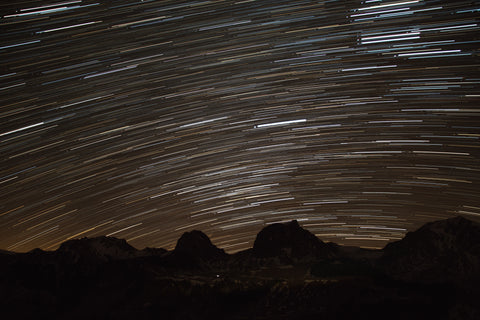
a. Star Trails
Star trails are the sweeping, long lines you see in astrophotography that are achieved through long exposure. By keeping the shutter open you allow the stars to move across the sky from the Earths movement, which causes the look of motion. A suggested base setting to try for star trails is a 3-4 minute exposure with an iso of 500-600 and F5.6.
b. Still / Milky Way
To capture a still photo of the sky, your settings will be quite different. Your shutter will be open for a significantly shorter amount of time, as we want to avoid the motion blur of the sky. This means your ISO will also have to be higher, try around 800 or more. To determine how to avoid a star trail you can use the Rule of 600. Simply divide 600 by the focal length of your lens, for example, if I am using a 24mm my calculations would look like this: 600/24 = 25. This means that my shutter speed cannot be longer than 25 seconds in order to avoid a trail.
11. Light Painting
If you would like to illuminate the foreground of your photo, you can use the technic which is known as light painting. Using a flashlight, slowly move the light onto the areas you would like to highlight. This can take some experimenting so be patient. You can also decide to create an HDR shot, where you can take a photo of the foreground and then the sky and merge them together in Photoshop. The same technic can be used for illuminated tents, people holding a flashlight in the shot etc.
12. Post Processing
Like any type of photo editing, post-processing is totally up to your discretion and creativity. However, there are some tricks and tips that you can use to help you stars pop. Start by boosting the exposure and clarity, adjusting the white balance and raising the saturation. Perhaps the most important part is reducing the noise, because your ISO is so high there will be a lot of grain present, but this can easily be reduced in photoshop. You can also try burning and dodging the areas in your foreground to help things stand out.Here is an example of a quick shot I took while on a camping trip in Canada.


As you can see, by boosting the clarity, whites, exposure and vibrancy the stars and milky way are much more visible. Each photo will have different needs, so play around until you find what works best for you.
For star trail photography, try stacking several shots as layers and then setting them to lighten mode. This will create more streaks and allow you streaks to be longer if you took your shots back to back.
There you have it, our beginners guide to astrophotography. Astrophotography can seem intimidating at first but with practice, patience and a lot of experimenting you are sure to get some beautiful shots. We would love to see what you create so make sure you share with us on Instagram, Facebook or Pinterest. Happy Shooting! xx